 In his book The Seven Spiritual Laws of Success, Deepak Chopra encourages folk to be quick to offer a gift wherever one goes and to whomever one comes in contact with. The gift, he says, can be flowers, a compliment, or even a kind thought. As children, our parents taught us to be generous with our gratitude by returning a kindness with a simple letter or a thank you card. As adults, we continue with this tradition. For example, when someone invites us to their home, we always take some token of appreciation. We usually hand make paper for “thank you” cards and envelopes, but recently we remembered salt dough, and a new joy was born.
When Kara was a child she learned how to make salt dough. It’s like Playdough, but even better. It can be molded into various shapes and then heated in the oven to preserve the shape.
And it’s super easy to make.
We begin by mixing three simple ingredients in a large bowl.
2 cups Flour
2 cups Salt
1 cup Water
We stir until the mixture becomes too firm to stir, then we just knead it with our hands (the amount of kneading can  vary). When it’s ready, the dough should feel smooth and a little moist, but it should not stick to your hands. If it’s sticking, simply knead a bit more. It just needs to be pliable and not too wet or sticky. We’ve learned over time to line a cookie sheet with parchment paper, and once the dough feels workable, roll it out (right onto the cookie sheet) to about a 1/4″ thickness. We do it this way because the cut pieces stick to the surface of whatever you roll them onto, and they often get destroyed in the process of trying to move them to the cookie sheet.
Note: We want our finished piece to be about 1/4″ thick. If we want to set other designs on top of our cut piece, then we will need to roll the dough 1/8″ thick (see heart bow piece below).
Once it’s rolled out, we use a cookie cutter–or any other cutting tools–to cut out a design. If our dough sticks to our cutter, we dip the cutter in flour before pressing into the dough.
 Next, we carefully pull away the dough from around the edges of the cut shape. Note that this selvage dough can be re-rolled and reused.
If the dough is being “uncooperative” (bad dough, no monkeys for you), once the dough is on the cookie sheet, we cut the dough into squares just larger than the size of the cutter, cut out our pieces from each square, and remove the selvage.
At this point, the creativity kicks in. Since the dough sticks to itself so well, we can attach other pre-cut or molded pieces to our cut-out shape.
The little heart bow piece pictured here was created with this method, using a heart shaped cookie cutter (a must have in our household).
We poked holes in it with the end of a “f” size crochet hook, and then we formed the little bow, gently pressing it into the heart.
Let your imagination run wild when it comes to finding and trying items that can be used to decorate the pieces once they’re cut out. One of our favorites is rubber stamps– with or without monkeys, but you really can’t go too wrong with a rubber monkey stamp.
We often make “ornament” style thank you gifts from salt dough. In this case, before we bake our pieces, we use a straw or pen cap to make a hole big enough for a ribbon.
In case you haven’t noticed, we like monkeys. The concept of playful monkeys most accurately represents the kind of friendship we’ve enjoyed and aspire to. Monkey business? Well, yeah, that too, but just a little.
The monkey impression on this heart medallion was of course made using a rubber stamp. However, sometimes a stamp does not leave well defined lines. In these instances, we use carving tools to deepen the lines. We recently discovered that the “ball” tool in our fingernail painting art kit is very useful for this purpose. Again, we pretty much use whatever is handy and will help us accomplish our artistic goals.
A note about ribbon: Thrift shops often sell beautiful ribbon very inexpensively. The ribbon pictured here is lovely sage colored silk. It was a small spool, but it was perfect for this project.
Ok, next step. We heat the oven to 250 degrees and bake our creations until they’re completely hard. If they brown (you don’t want that), they usually crack, so we have learned to start checking them after 20 minutes. If they aren’t ready at 20 minutes, we leave them in, and check on them every 10 minutes until their done.
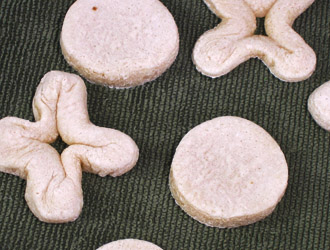 We did a trial run on a set of salt dough tic-tac-toe game pieces. They turned out pretty well, but not perfect. They were quite non-uniform — perhaps not the best for gift giving, but certainly great for playing one of our favorite games.
The pieces pictured here are about silver dollar sized. They provide a good representation of what salt dough should look like after it comes out of the oven. These are completely cooked and ready for painting.
Game anyone?
 Once the pieces cool, we paint, varnish, or mod podge them.
The day we created the Heart Bow and the Heart Monkeys medallions shown at the top of the page, we were enjoying a glass of port wine. James, who himself sports a “port wine stain” birthmark on his cheek, suggested that we stain our pieces with wine before baking them. They came out more brown than port-colored, but we’ve created a list of a few other staining products we’d like to try:
Future staining experiments:
Spirulina Cinnamon Tea Coffee Turmeric Cocoa
We’d also like to try these impression items:
Leaves
Coins
Crystal glass or dish surfaces
Once again, we hope we have inspired you to Do-it-together! and to take a little bit of gratitude with you, wherever you go.
In Kindness,
~JnK